Microsoft Teams Rooms Setup Instructions.
Bring your conference rooms to life! Thanks to our integration with Microsoft Teams Rooms, your MTR devices can play digital signage content whenever they are idle. Display corporate communications, videos, KPI dashboards… even your company’s social media feeds. In order to run XOGO Digital Signage on a Microsoft Teams Rooms (MTR) device, please ensure that the minimum requirements are met and then follow the installation steps below. Please contact us with questions or check out this tutorial video for additional help.
Prerequisites:
XOGO Pro account (create yours today at manager.xogo.io)
Microsoft Teams Rooms device (currently Windows only - Android support is coming in early 2026!)
Microsoft Teams Rooms app (version 5.0 or higher)
Microsoft Teams Rooms pro license
1. Enable digital signage in Microsoft Teams Rooms
a) Log into the Teams Rooms Pro Management Portal (PMP).
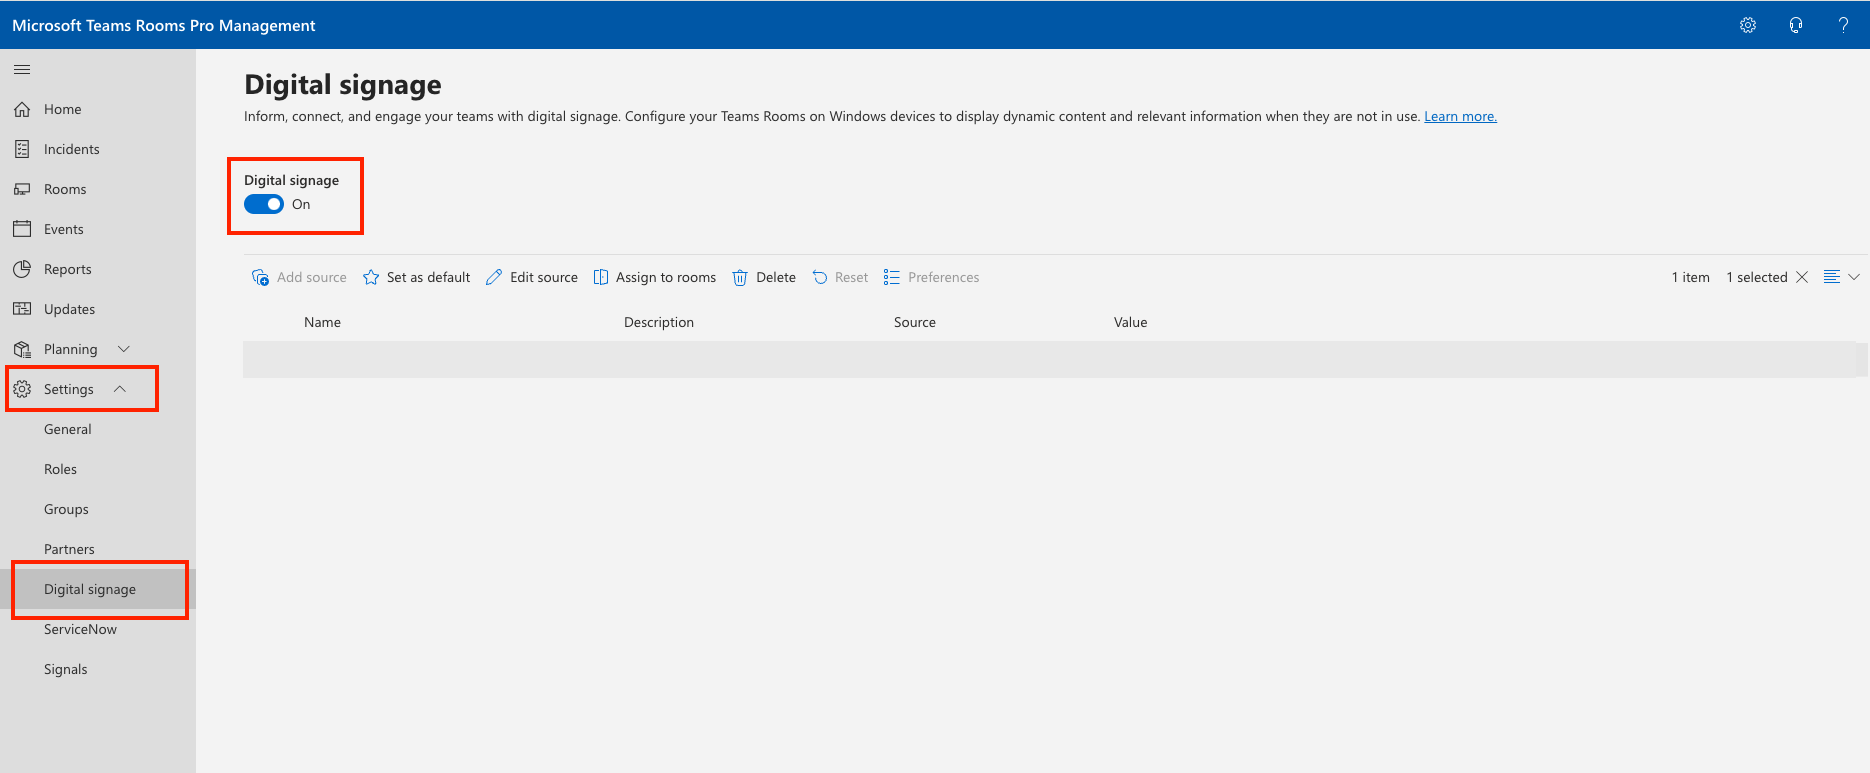
b) Navigate to settings > digital signage > toggle digital signage to ON.
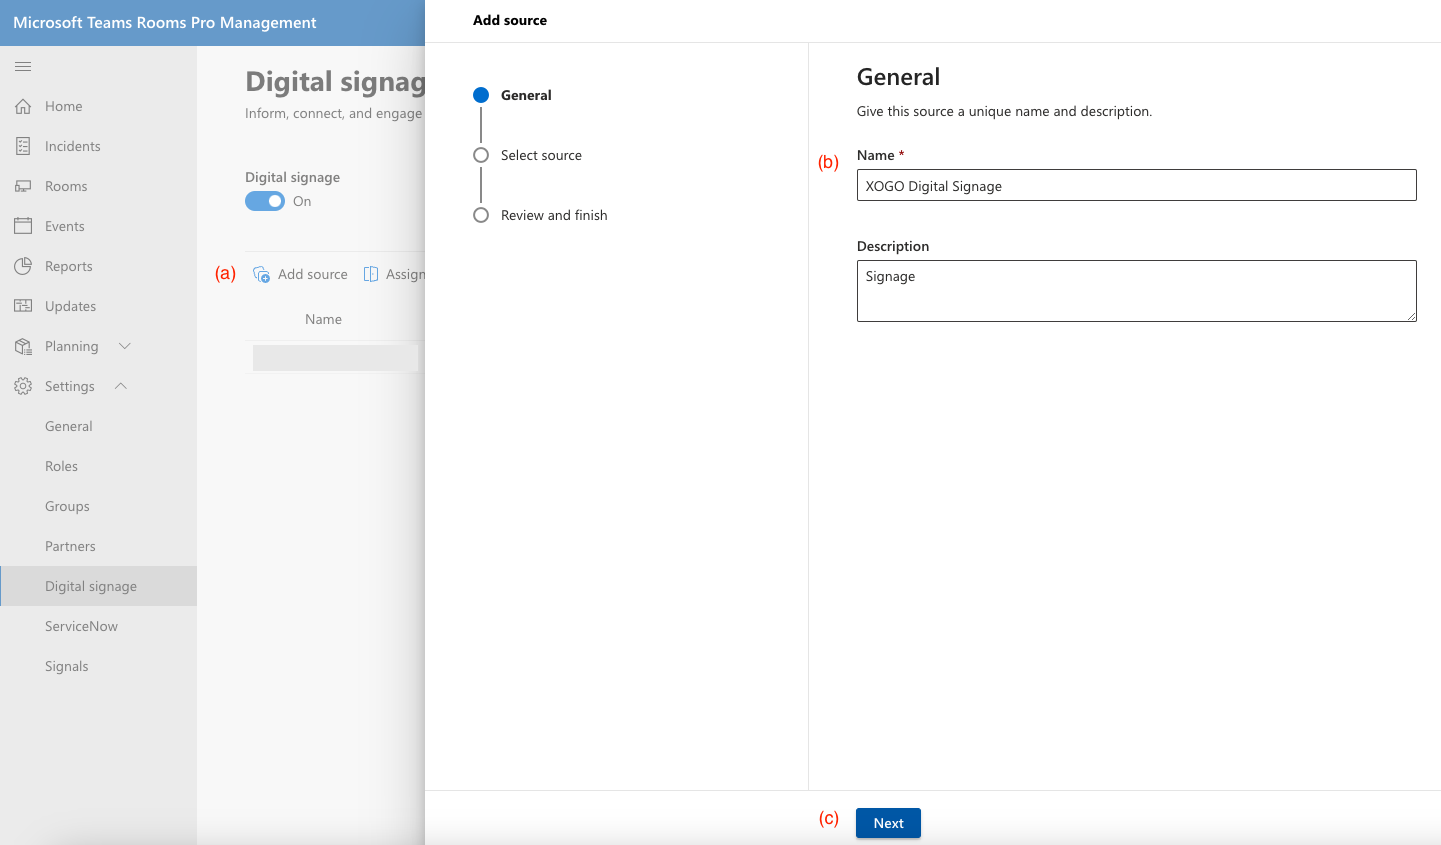
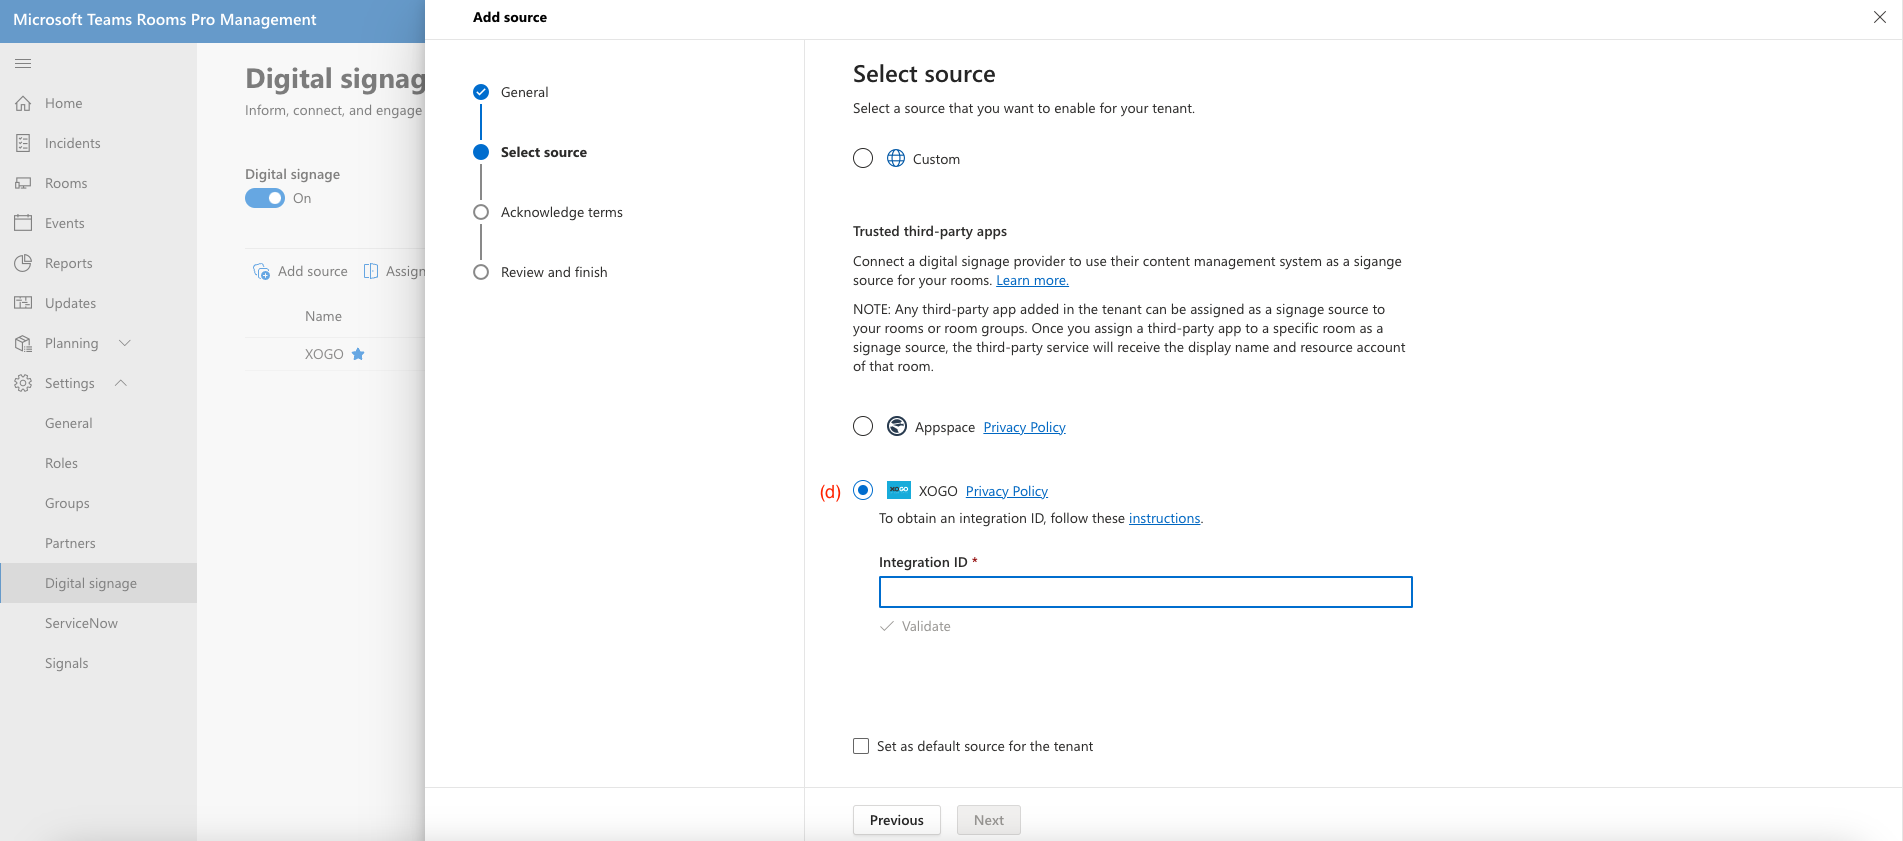
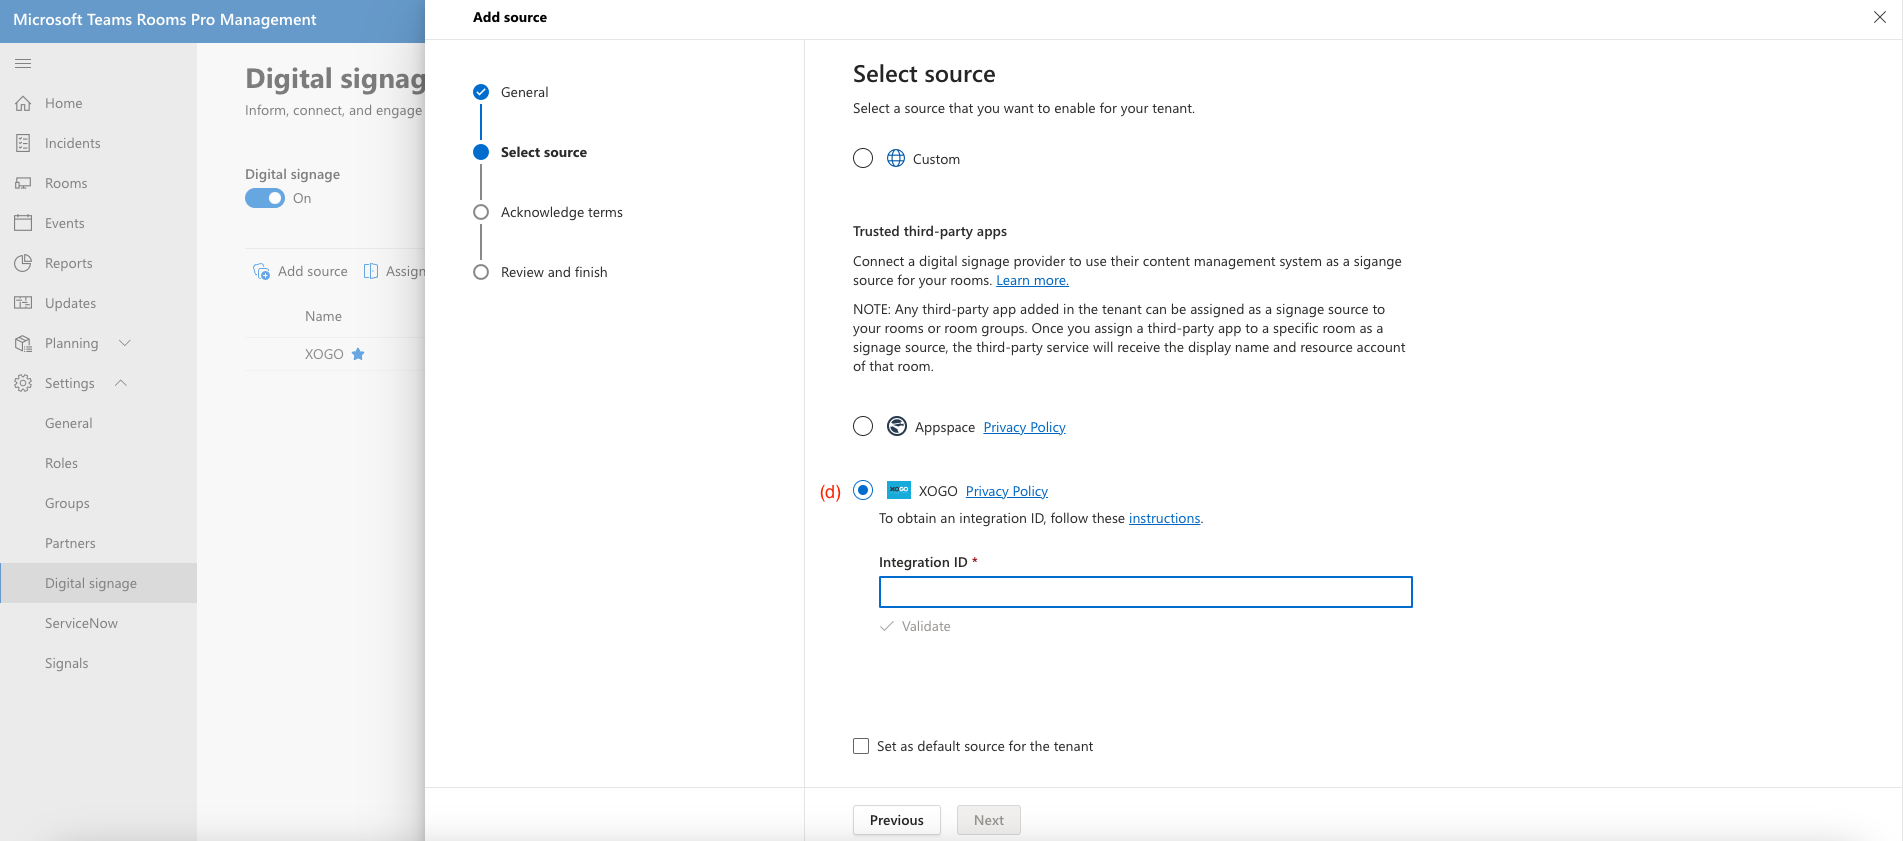
c) Click on Add Source, assign a simple name and description (i.e. XOGO Digital Signage), and select XOGO as your digital signage source. You will be asked for an integration ID, which we will create in the next step.
Toggle digital signage to ON in the Teams Rooms settings.
Click on Add Source then type in a simple name i.e. XOGO Digital Signage.
Now select the XOGO button. You’ll create your integration ID in the next step.
2. Generate your integration ID in XOGO Manager
a) Log into XOGO Manager from any web browser.
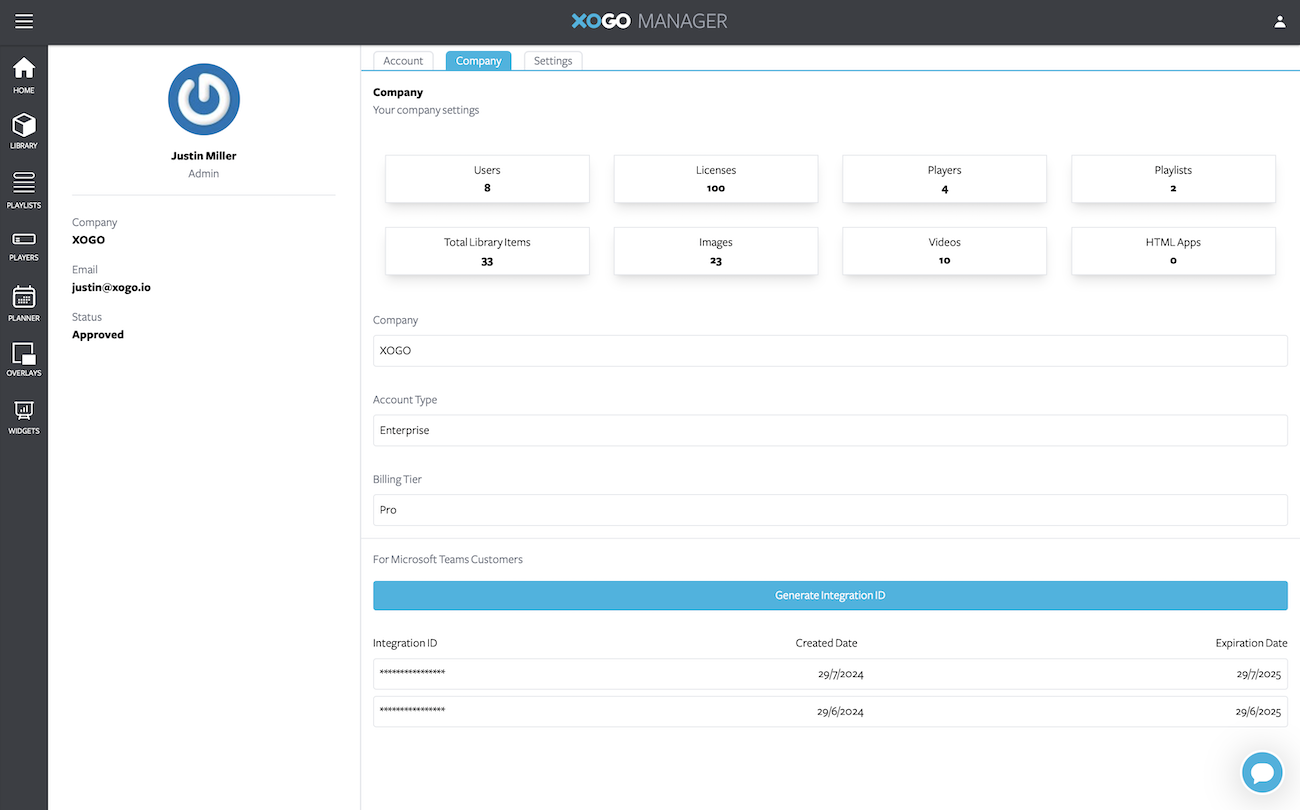
b) Click the user icon in the top right corner, then select profile > company > generate integration ID (blue button)
c) Copy the integration ID to your clipboard.
d) Now head back over to the Microsoft Teams Pro Management Portal (PMP) and paste in your integration ID. Click to set XOGO as the default source for the tenant. Then click next, accept the T&Cs, and click to review and finish.
Click the blue button to generate your integration ID for Microsoft Teams Rooms. Copy this integration ID to your clipboard.
Paste the integration ID into the Microsoft PMP, then select “set as default source for the tenant”. Click next, accept the T&Cs, then click review & finish.
3. Finish the digital signage setup in Microsoft Teams Rooms
a) Click on settings > digital signage > assign to rooms.
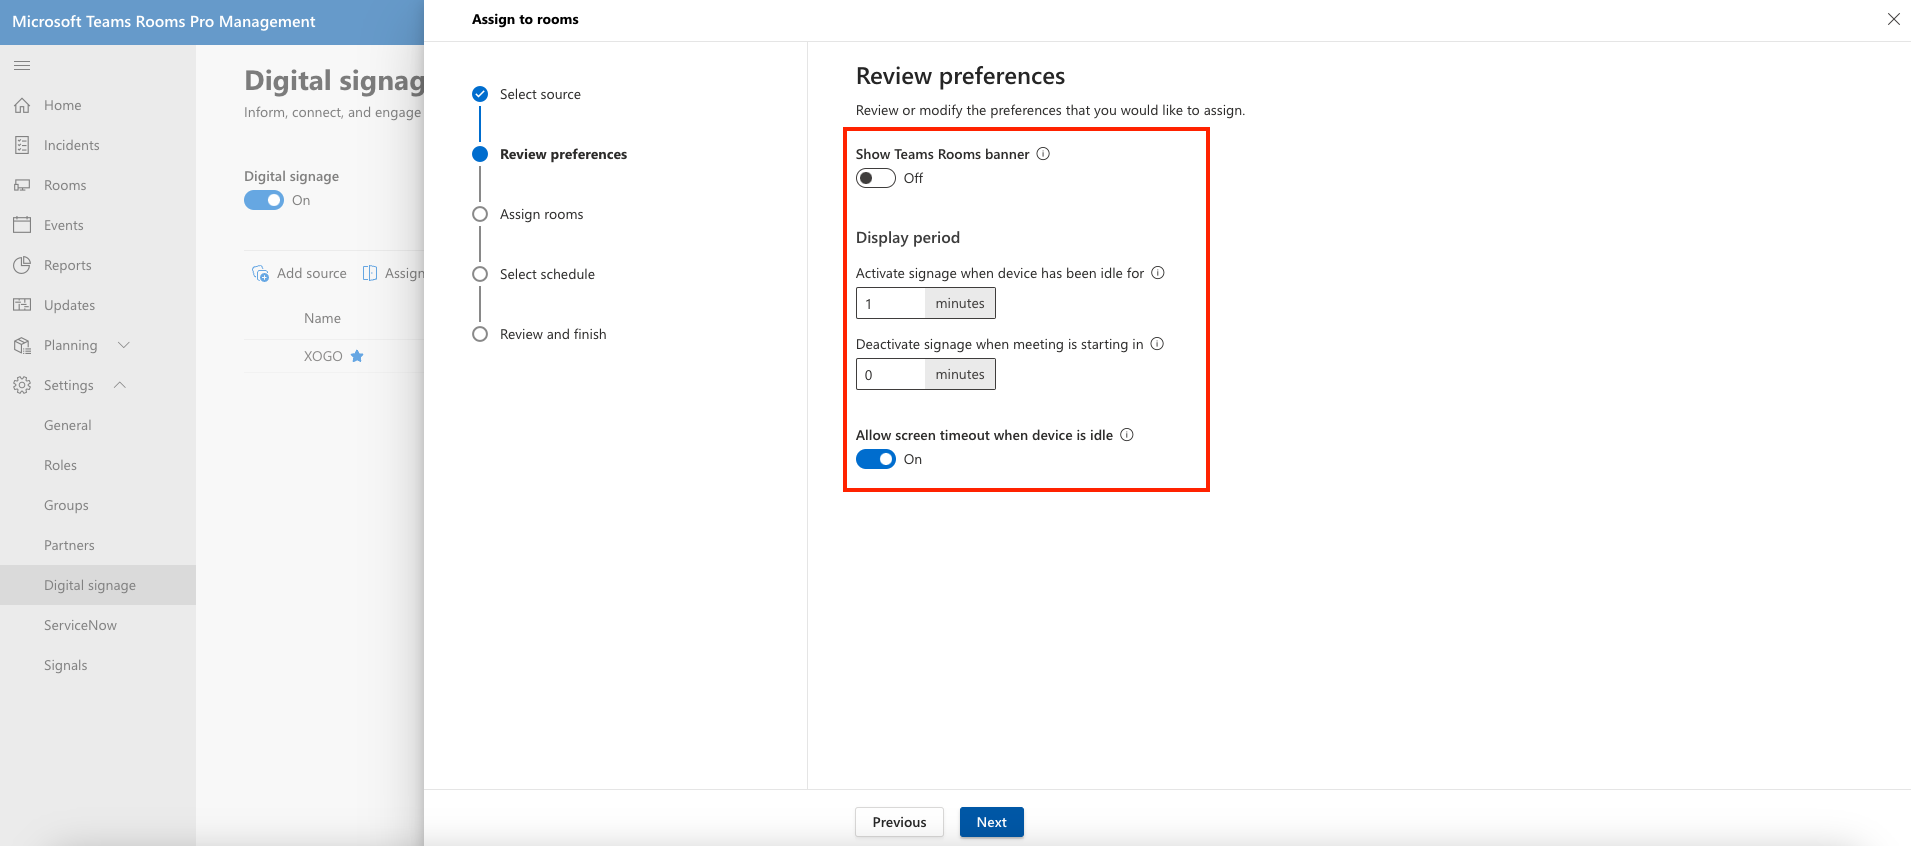
b) Select XOGO as your digital signage source, then next, and click to review your signage preferences. This is where you can adjust how long it takes for digital signage to kick in when your MTR device is idle, and at what point it should disappear prior to the next meeting. You can also choose whether to enable or disable the Teams banner whenever your signage content is playing on the MTR screen.
c) Click next in order to assign digital signage to one or more of your MTR rooms, then review & finish.
Click assign to rooms. You’ll have the opportunity to adjust your digital signage preferences and assign signage to your Teams Room(s).
Adjust when you would like digital signage content to kick in, and whether or not to display the Teams Rooms banner on top of your signage content.
4. Control your signage content in XOGO Manager
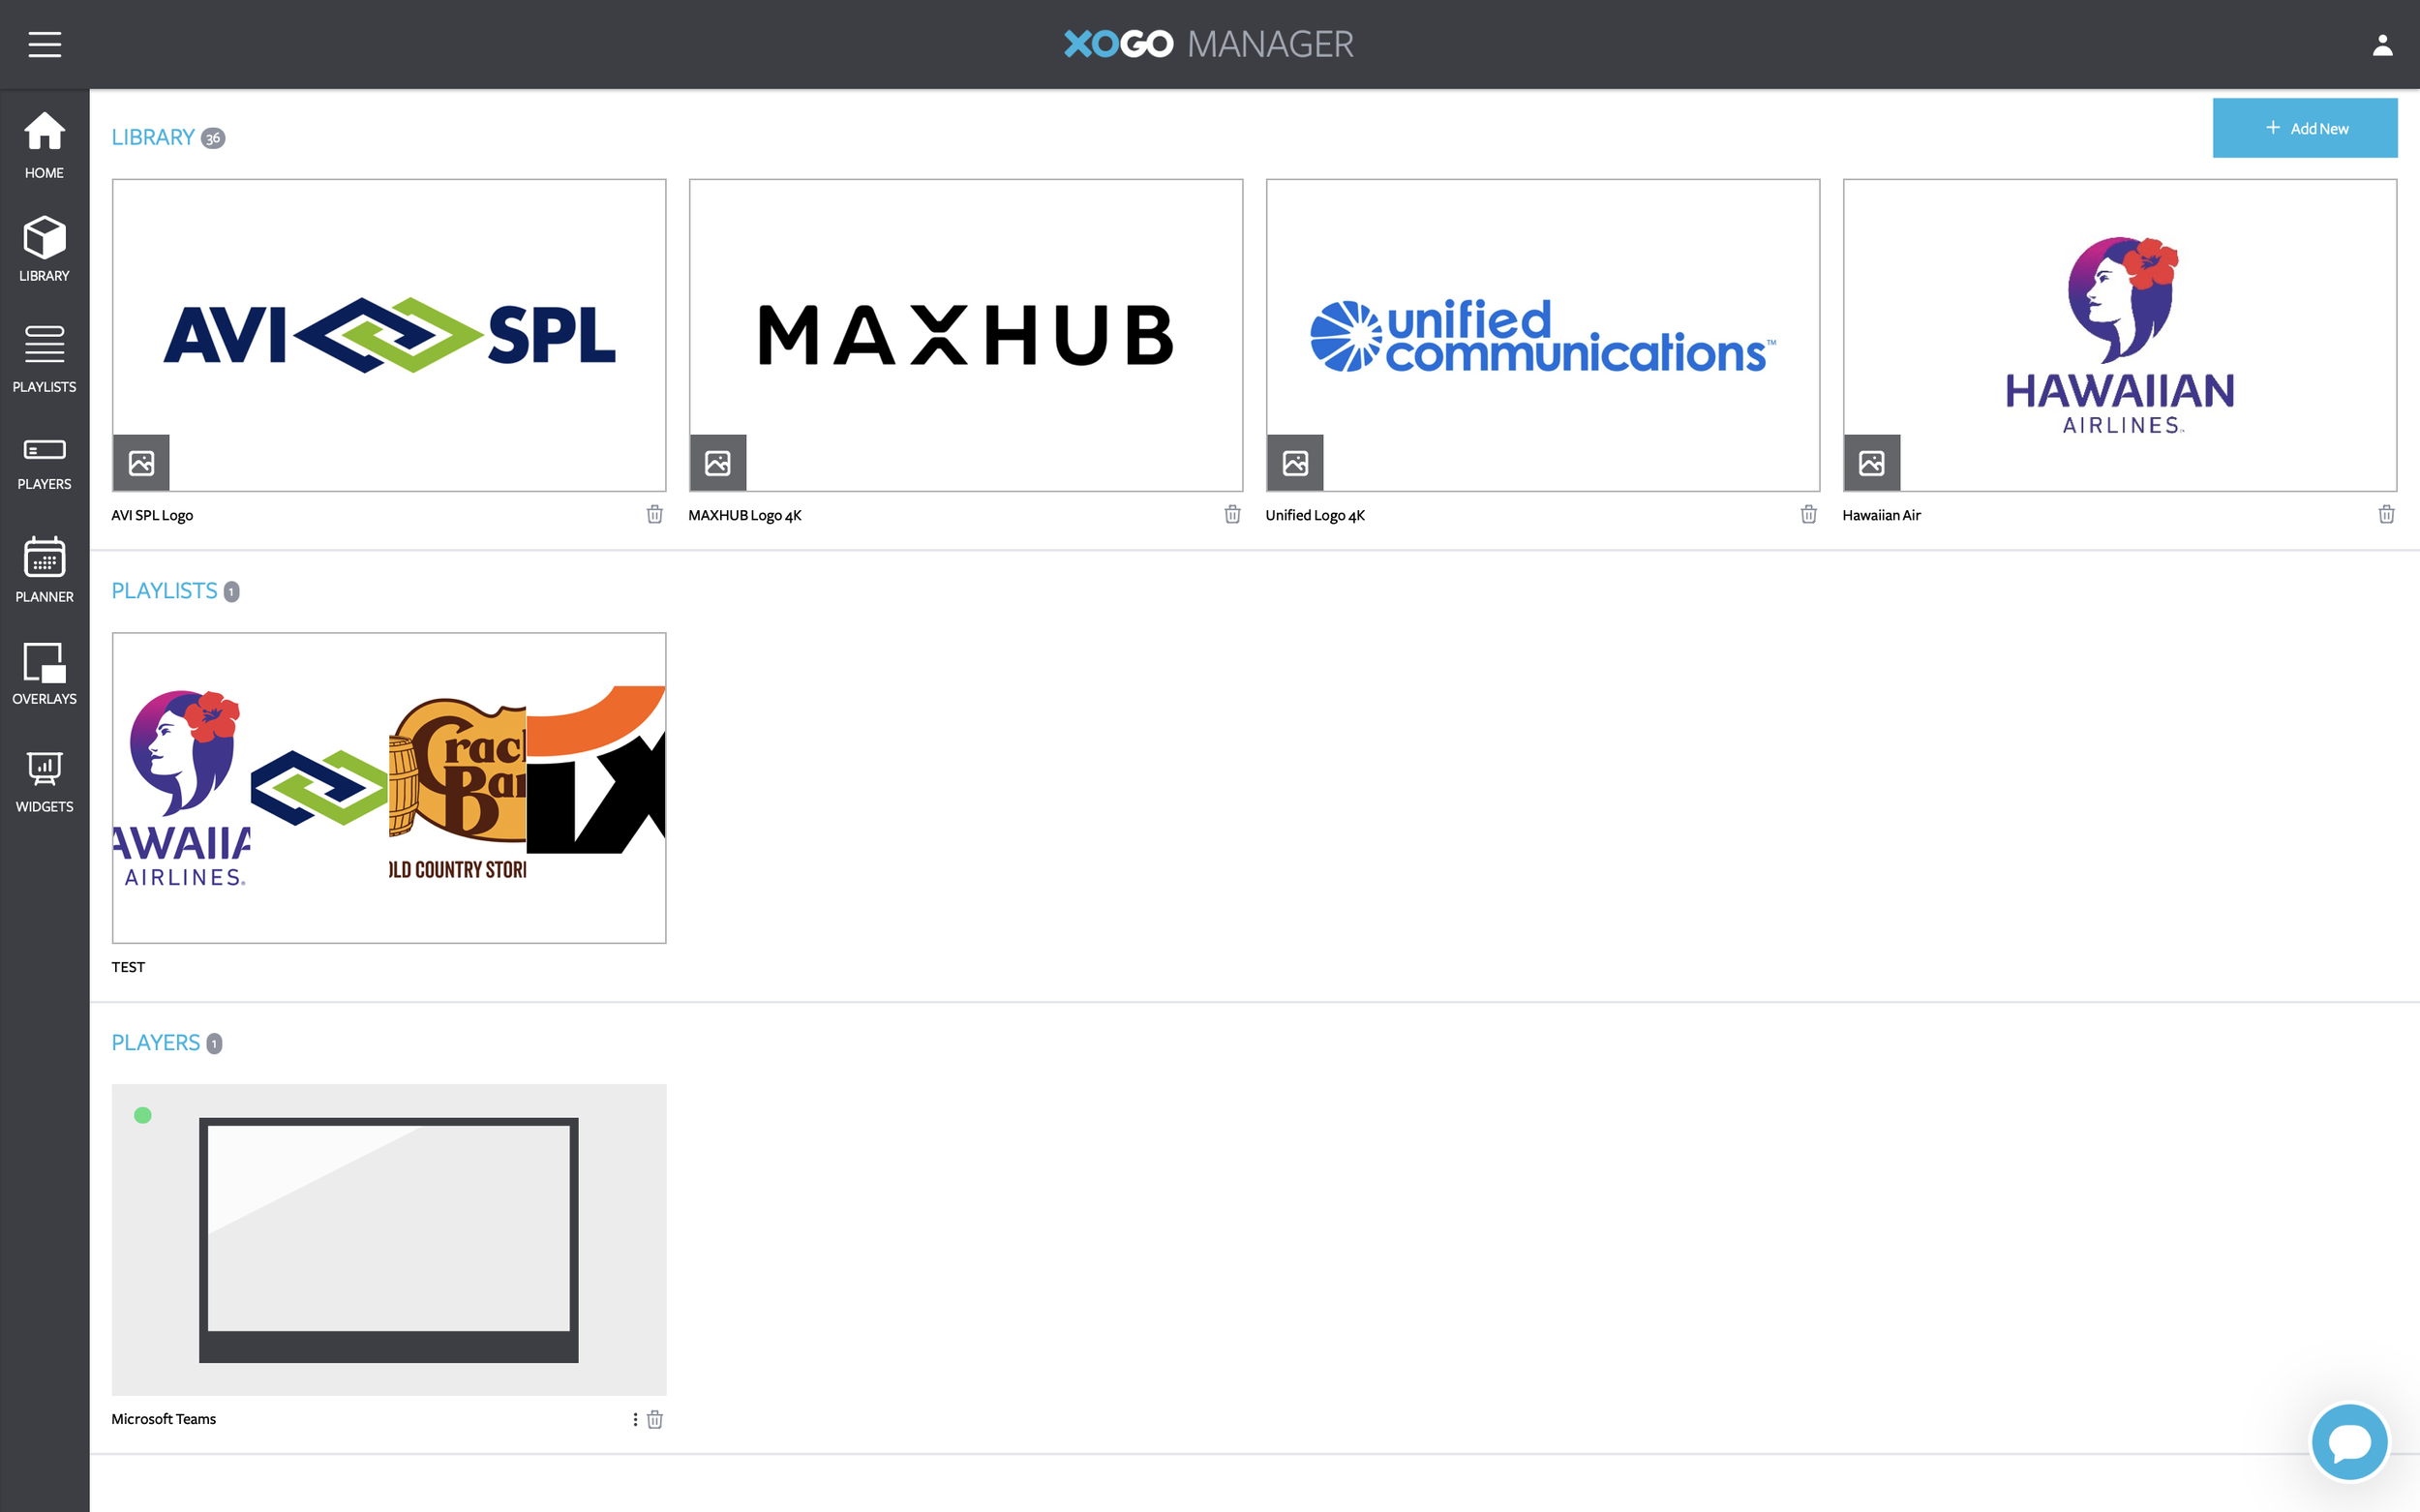
a) Now log back into XOGO Manager and click on the Players section. You should see your Teams Rooms device(s) in the list of media players. You will need to click on each device, assign it a playlist, and click to save. This is the playlist of content that will appear on the MTR screen whenever it’s idle for X amount of time (as you specified in step 3 above).
b) If you don’t have a playlist yet, just click +Add New in the upper right corner of XOGO Manager in order to upload your media and organize it into one or more playlists of content. (Related video: How to Create a Playlist). Then click on each player and assign it a playlist.
Pro tip: you can control all of your digital signage players in XOGO Manager, whether they are MTR devices, XOGO Minis, Fire Sticks, Windows PCs… or any combination thereof. XOGO allows you to turn nearly any device into a digital sign!
Log into XOGO Manager anytime to upload new content or control which MTR devices are playing which playlists.
5. Enjoy the new capability!
XOGO Player is now installed on your MTR device(s), and will run on the external display whenever the MTR device(s) is/are idle. You can control your digital signage content and playlists remotely (from anywhere!) using XOGO Manager. Please contact our tech support team if you have trouble getting XOGO Player set up, or questions about how to control your content and players (or if you’d just like to give us feedback!). Thanks for choosing XOGO.
